Bird Netting Frame
Apr. 19th, 2012 06:09 pm I've been having fun making things out of PVC pipes. Last summer, I made a frame of PVC pipe to support bird netting over the blueberries (we tried using bamboo and green balls for joints but they didn't work well).
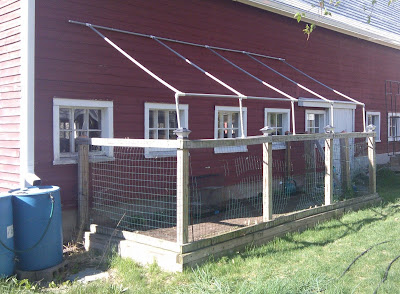
A. wanted some sort of protection for young plants from birds (we already have a 4' high fence surrounding the raised veggie bed to keep out deer, turkeys, rabbits, and ground hogs). I ended up building a plastic frame out of PVC pipes to go over the existing fence and attach to the side of the barn. Over the frame will be placed bird netting. I made the frame higher on the barn side, so if we cover it with plastic to make a temporary green house in the spring, the water will run off of the roof.
Below are some notes for building your own structures.
Make detailed drawings and figure out what you need for lengths before you start cutting (if you plan well, you can minimize the wastage).
Dry fit everything, then use a permanent marker (e.g., Sharpie) to label each joint (mark both the pipe ends and connectors). If you have trouble pulling part a joint, you can use a large pair of pliers to wiggle the pipe. Or put the pipe on a smooth surface (such as a large sheet of cardboard), then step on the pipe with one foot, and use your other foot to kick off the connector.
PVC Pipe:
I used grey electrical conduit. It says it's "sunlight resistant" and it is cheaper than white plumbing PVC pipe (but it has a swelled end for connecting to other pipes) The pipe is cheap. It's probably more convenient to buy extras, than to make a trip get more if you run out.
I used 10'x3/4 PVC pipe. Cost at Home Depot is $1.59 each ($1.51 if you buy at least 10 pipes). If you're going to build a free standing structure, you might want to use a wider diameter pipe.
Connectors:
Use white PVC connectors (the grey plastic electrical connector are not useful for building structures). They're about $0.30 for a 3/4" 90 connector and $0.80 for a 3/4" T connector. A threaded plug for a 1/2" pipe makes a good end cap (I used them to make sure that bugs didn't try to build a nest inside the pipes.
If you have four pipes connecting, you'll need to use two Ts (and a short pipe to connect the two Ts). Two of the pipes will end up being offset. If pipes using the Ts are not in the same plane, draw lines across the joint so you can easily get the pipes to align before the solvent cement sets (in a couple of seconds). If you have three pipes meeting at angles, you can use T and and a 90, plus a short pipe segment.
Note how deep the connector fittings are, and make a mark on the pipe so you can know how far to push the pipes.
The entire structure has been glued together except for three connectors, so I can split it into two pieces and store it in the winter.
Hooks:
Used #6 hooks to support the frame. Opened up the hooks using a vice to fit the diameter of the 3/4" PVC pipes.
Solvents:
Very nasty chemicals, only use outside.
Use primer (purple) on both parts of the joint, then before it dries use the solvent cement on both parts.
The solvent acts as a lubricant, so it's easy to push together a pipe and fitting, but you have only a few seconds to adjust a joint before it starts to set.
Look for the two can box, it's about $2 cheaper, than buying the primer and solvent cement separately).
Detailed advice on how to use primer and solvent cement.
http://www.oatey.com/apps/catalog/instance_assets/assets/How_to_Use/Solvent_Cement_How_To_Final.pdf
Cutting tool, ratcheting
A ratcheting pipe cutter is much easier to use than a reciprocating saw (e.g., Sawzall) for cutting 3/4" or 1" diameter PVC pipe.
This is what I used: http://www.homedepot.com/h_d1/N-5yc1v/R-202351847/h_d2/ProductDisplay?catalogId=10053&langId=-1&keyword=brasscraft+pvc&storeId=10051
A. wanted some sort of protection for young plants from birds (we already have a 4' high fence surrounding the raised veggie bed to keep out deer, turkeys, rabbits, and ground hogs). I ended up building a plastic frame out of PVC pipes to go over the existing fence and attach to the side of the barn. Over the frame will be placed bird netting. I made the frame higher on the barn side, so if we cover it with plastic to make a temporary green house in the spring, the water will run off of the roof.
 |
| From House |
 |
| From House |
Below are some notes for building your own structures.
Make detailed drawings and figure out what you need for lengths before you start cutting (if you plan well, you can minimize the wastage).
Dry fit everything, then use a permanent marker (e.g., Sharpie) to label each joint (mark both the pipe ends and connectors). If you have trouble pulling part a joint, you can use a large pair of pliers to wiggle the pipe. Or put the pipe on a smooth surface (such as a large sheet of cardboard), then step on the pipe with one foot, and use your other foot to kick off the connector.
PVC Pipe:
I used grey electrical conduit. It says it's "sunlight resistant" and it is cheaper than white plumbing PVC pipe (but it has a swelled end for connecting to other pipes) The pipe is cheap. It's probably more convenient to buy extras, than to make a trip get more if you run out.
I used 10'x3/4 PVC pipe. Cost at Home Depot is $1.59 each ($1.51 if you buy at least 10 pipes). If you're going to build a free standing structure, you might want to use a wider diameter pipe.
Connectors:
Use white PVC connectors (the grey plastic electrical connector are not useful for building structures). They're about $0.30 for a 3/4" 90 connector and $0.80 for a 3/4" T connector. A threaded plug for a 1/2" pipe makes a good end cap (I used them to make sure that bugs didn't try to build a nest inside the pipes.
If you have four pipes connecting, you'll need to use two Ts (and a short pipe to connect the two Ts). Two of the pipes will end up being offset. If pipes using the Ts are not in the same plane, draw lines across the joint so you can easily get the pipes to align before the solvent cement sets (in a couple of seconds). If you have three pipes meeting at angles, you can use T and and a 90, plus a short pipe segment.
Note how deep the connector fittings are, and make a mark on the pipe so you can know how far to push the pipes.
The entire structure has been glued together except for three connectors, so I can split it into two pieces and store it in the winter.
Hooks:
Used #6 hooks to support the frame. Opened up the hooks using a vice to fit the diameter of the 3/4" PVC pipes.
Solvents:
Very nasty chemicals, only use outside.
Use primer (purple) on both parts of the joint, then before it dries use the solvent cement on both parts.
The solvent acts as a lubricant, so it's easy to push together a pipe and fitting, but you have only a few seconds to adjust a joint before it starts to set.
Look for the two can box, it's about $2 cheaper, than buying the primer and solvent cement separately).
Detailed advice on how to use primer and solvent cement.
http://www.oatey.com/apps/catalog/instance_assets/assets/How_to_Use/Solvent_Cement_How_To_Final.pdf
Cutting tool, ratcheting
A ratcheting pipe cutter is much easier to use than a reciprocating saw (e.g., Sawzall) for cutting 3/4" or 1" diameter PVC pipe.
This is what I used: http://www.homedepot.com/h_d1/N-5yc1v/R-202351847/h_d2/ProductDisplay?catalogId=10053&langId=-1&keyword=brasscraft+pvc&storeId=10051
no subject
Date: 2012-04-20 02:06 am (UTC)no subject
Date: 2012-04-20 02:19 am (UTC)no subject
Date: 2012-04-20 05:25 pm (UTC)